Blog Customization
minimal-mistake 테마를 이용해서 블로그를 커스터마이징 해보자!
Navigation
📂/_data/navigation.yml에서 설정.
main:
  - title: "About"
    url: /about/
  - title: "Categories"
    url: /categories/
- About
📂/_pages/about.md생성
---
	permalink: /about/
	title: "About"
	last_modified_at: 2021-07-08
	toc: true
---
내용을 쓰면 된다!
- 이렇게만 적으면 내 프로필이 안나온다!!!
📂/_config.yml을 열어서 아래와 같이 추가해주자!
# Defaults
defaults:
# _pages
  - scope:
      path: ""
      type: pages
    values:
      layout: single
      author_profile: true
- 이제 잘 나오는 것을 확인할 수 있다!
- Category
📂/_pages/category-archive.md생성
---
title: "Posts by Category"
layout: categories
permalink: /categories/
author_profile: true
---
- Tag
📂/_pages/tag-archive.md생성
---
title: "Posts by Tag"
permalink: /tags/
layout: tags
author_profile: true
---
favicon
- 주소창에 아이콘을 적용해보자!
- https://favicon.io/emoji-favicons 같은 곳에서 원하는 아이콘을 다운로드 받자!
- 압축을 풀어서 안의 파일을 모두 블로그
📂Repository 최상위 디렉토리에 다 넣자! png나jpg이미지 파일을 https://realfavicongenerator.net/에서select your favicon image버튼을 눌러 업로드하자!- 곧
Generate your Favicons and HTML code가 나타면 클릭하고 HTML코드를 복사하자! - HTML태그를
📂/_includes/head/custom.html에 붙여넣고 저장하자!
- 아래 코드를 참고!
<link rel="apple-touch-icon" sizes="180x180" href="/apple-touch-icon.png">
<link rel="icon" type="image/png" sizes="32x32" href="/favicon-32x32.png">
<link rel="icon" type="image/png" sizes="16x16" href="/favicon-16x16.png">
<link rel="manifest" href="/site.webmanifest">
<link rel="mask-icon" href="/safari-pinned-tab.svg" color="#5bbad5">
<meta name="msapplication-TileColor" content="#00aba9">
<meta name="theme-color" content="#ffffff">
Highlight
- Code Highlight : Programing Lang을 입력해주면 해당 언어의 변수나 함수에 색을 칠해준다.
- Inline Highlight : 원하는 문장에 색깔을 입혀 강조할 수 있다.
- Code Highlight
```Python
	def syntaxHighlight():
	val = 10
	return val
```
	def syntaxHighlight():
	val = 10
	return val
- Inline Highlight
`강조해보자!`
강조해보자!
└ Inline Highlight Color
- 배경색과 글자색을 변경해보자.
📂/assets/css/main.scss
	.language-plaintext { // Inline
		font-family: $monospace; // 폰트
		font-size: $type-size-5; // 글자 크기. 낮을 수록 크기가 큼
		color: #cd853f; // 글자색
		background: #c0ffee; // 배경색
	}
Thema Skin
- 테마의 스킨을 마음대로 꾸며보자!
📂/_sass/minimal-mistakes/skins/_custom.scss를 만들어 주자!
/* ==========================================================================
   Custom Skin (내가 만든 스킨!!) /_sass/minimal-mistakes/skins/_custom.scss
   ========================================================================== */

/* Colors */
$background-color: #F2FFED !default; // 배경색
$text-color: #40514e !default; // 글자색
$muted-text-color: #40514e !default; // 마우스 커서를 대지 않았을 때 글자색
$primary-color: #3cb371 !default; // 링크 글자 마우스 댔을 때 색
$border-color: mix(#fff, #40514e, 75%) !default;
$footer-background-color: #00fa9a !default; // 바닥배경색
$link-color: #32cd32 !default; // 링크 글자 마우스 안댔을 때 색
$masthead-link-color: $text-color !default;
$masthead-link-color-hover: $text-color !default;
$navicon-link-color-hover: mix(#fff, $text-color, 80%) !default;

.page__footer {
  color: #fff !important; // override
}

.page__footer-follow .social-icons i,
.page__footer-follow .social-icons .svg-inline--fa {
  color: inherit;
}
📂/_config.yml에서minimal_mistakes_skin부분에"custom"이라고 수정해주자!
font
- 폰트를 선택하고
select this style을 눌러줍시다. - 구글 폰트!
- 이 블로그에는
Gamja Flower가 적용됨 @import코드를 복사해서📂/assets/css/main.scss에 붙여넣기!@import url('https://fonts.googleapis.com/css2?family=Gamja+Flower&display=swap');📂/_sass/_variables.scss에font-family넣기/* system typefaces */ $serif: Georgia, Times, serif !default; /* 먼저 적용된 폰트가 우선하는 듯? "Gamja Flower"를 넣자! */ $sans-serif: -apple-system, BlinkMacSystemFont,"Gamja Flower", "Roboto", "Segoe UI", "Helvetica Neue", "Lucida Grande", Arial, sans-serif !default; $monospace: Monaco, Consolas, "Lucida Console", monospace !default;
Remove Hyperlink Underline
- 하이퍼링크 밑줄을 제거해보자!
📂/_sass/_base.scss
/* links */

a {
  /* devinlife : a link 하이퍼링크 밑줄 없애기 */
  text-decoration: none;
  &:focus {
    @extend %tab-focus;
  }
Scroll Bar
- 스크롤바의 모양과 색을 변경해보자!
📂/_layouts/default.html의<head>부분에 아래 코드를 넣어주면 된다.
    <!-- 스크롤바 모양 및 색 변경 -->
    <style>
      ::-webkit-scrollbar{width: 16px;}
      /*스크롤바 배경색*/
      ::-webkit-scrollbar-track {background-color:#bbffcf; border-radius: 16px;}
      /*스크롤바 색*/
      ::-webkit-scrollbar-thumb {background-color:#68ff4a; border-radius: 16px;}
      /*마우스를 올렸을 때 스크롤바 색*/
      ::-webkit-scrollbar-thumb:hover {background: #32cd32;}
      ::-webkit-scrollbar-button:start:decrement,::-webkit-scrollbar-button:end:increment
      {
          width:12px;height:12px;background:transparent;
      }
    </style>
Comment
- 댓글기능을 추가해보자!
discuss는 무겁고 광고 때문에 별로라는 얘기를 들어서utterances를 사용하기로 했다.utterances는 github에 댓글을repository에 저장한다. github에 로그인해야 댓글을 달 수 있다.- https://utteranc.es/에서
repo와mapping방식을 작성한다.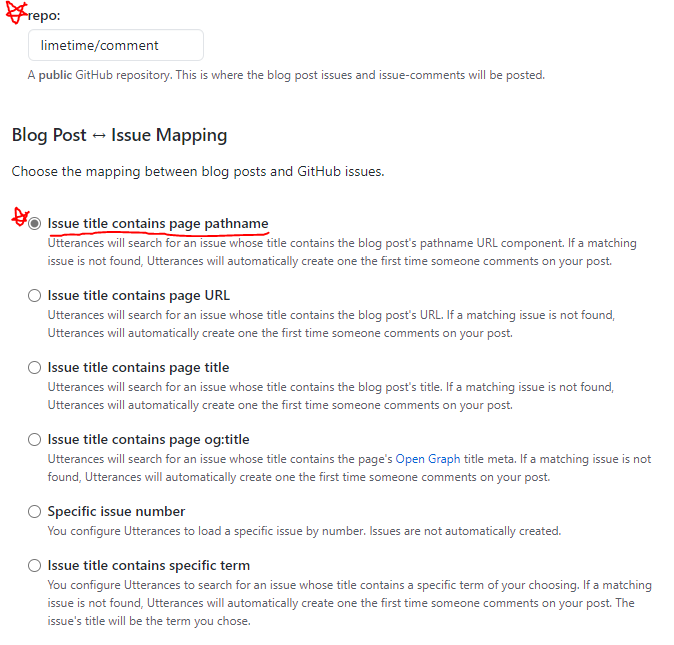
📂/_sass/minimal-mistakes/_page.scss에 아래코드 추가.
/* 댓글창 사이즈 유지. */
  .utterances {
    max-width: 100% !important;
  }
📂/_config.yml에서repository,provider,utterances항목을 작성해준다.
repository               : "limetimeline/comments" # GitHub username/repo-name e.g. "mmistakes/minimal-mistakes" 이거는 뭐 댓글 저장소.
comments:
  provider               : "utterances" # false (default), "disqus", "discourse", "facebook", "staticman", "staticman_v2", "utterances", "giscus", "custom"
  utterances:
    theme                : "github-light" # "github-light" (default), "github-dark" 테마(색)..
    issue_term           : "pathname" # "pathname" (default) 걍 이렇게 적으면 되고..
댓글남기기